Prerequisites and Requirements
Link to full Microsoft article: https://learn.microsoft.com/en-us/windows/security/identity-protection/hello-for-business/deploy/#windows-server-requirements
 |
|---|
 |
AzureAD Kerberos object in Active Directory
Link to full Microsoft article: https://learn.microsoft.com/en-us/entra/identity/authentication/howto-authentication-passwordless-security-key-on-premises#install-the-azureadhybridauthenticationmanagement-module
- Open a PowerShell prompt using the Run as administrator option. This must be done from a member server in the Active Directory domain that have domain management tools installed (can also be done on Entra Domain Services on member server that has domain management tools installed)
- Install the AzureADHybridAuthenticationManagement module:
# First, ensure TLS 1.2 for PowerShell gallery access.
[Net.ServicePointManager]::SecurityProtocol = [Net.ServicePointManager]::SecurityProtocol -bor [Net.SecurityProtocolType]::Tls12

# Install the AzureADHybridAuthenticationManagement PowerShell module.
Install-Module -Name AzureADHybridAuthenticationManagement -AllowClobber
- Create a Kerberos Server object.
# Specify the on-premises Active Directory domain. A new Azure AD
# Kerberos Server object will be created in this Active Directory domain.
$domain = $env:USERDNSDOMAIN

# Enter a UPN of a Global Administrator
$userPrincipalName = "administrator@contoso.onmicrosoft.com"

# Enter a Domain Administrator username and password.
$domainCred = Get-Credential

# Create the new Azure AD Kerberos Server object in Active Directory
# and then publish it to Azure Active Directory.
# Open an interactive sign-in prompt with given username to access the Azure AD.
Set-AzureADKerberosServer -Domain $domain -UserPrincipalName $userPrincipalName -DomainCredential $domainCred
Windows Hello for Business Policy enable
Link to full Microsoft article: https://learn.microsoft.com/en-us/windows/security/identity-protection/hello-for-business/configure
Enable Windows Hello for Business in the tenant-wide policy.
OBS: If any hybrid-joined devices are present in tenant, do not use this tenant-wide policy, but use account protection policy instead.
 |
|---|
Cloud Kerberos Trust Policy deployment in Intune
Credit to Peter Van Der Woulde: https://www.petervanderwoude.nl/post/configuring-windows-hello-for-business-cloud-kerberos-trust/
After creating the Kerberos server object and enabling Windows Hello for Business capability, the next step is to create a policy to tell Windows to use cloud Kerberos trust.
- Open the Microsoft Intune admin center portal and navigate to Devices > Windows > Configuration profiles
- On the Windows | Configuration profiles blade, click Create profile
- On the Create a profile blade, provide the following information and click Create
- Platform: Select Windows 10 and later to create a profile for Windows 10 and Windows 11 devices
- Profile: Select Settings Catalog to select the required setting from the catalog
- On the Basics page, provide the following information and click Next
- Name: Provide a name for the profile to distinguish it from other similar profiles
- Description: (Optional) Provide a description for the profile to further differentiate profiles
- Platform: (Greyed out) Windows 10 and later
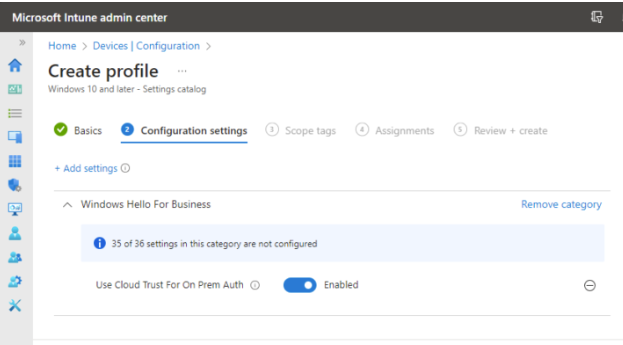
- On the Configuration settings page, as shown below in Figure 2, perform the following actions
- Click Add settings and perform the following in Settings picker
- Select Windows Hello for Business as category
- Select Use Cloud Trust For On Prem Auth as settings
- Switch the slider to Enabled with Use Cloud Trust For On Prem Auth and click Next
- On the Scope tags page, configure the required scope tags and click Next
- On the Assignments page, configure the assignment and click Next
- On the Review + create page, verify the configuration and click Create
 |
|---|
Experiencing Windows Hello for Business Cloud Kerberos Trust
To verify that the policies are successfully applied, use the commmand klist cloud_debug. That command shows the available TGT that can be used. Use the command dsregcmd /status. The SSO State section should show that the OnPremTgt and the CloudTgt are available. Once verified, you should be able to browse a fileshare that the user have access to, without being prompted for credentials.


Comments