Azure Virtual Machine – migrate from Azure Disk Encryption
- Intro
- Limitations
- Migration limitations and considerations
- Pre-Requisites
- Prerequisites
- How to migrate away from ADE and enable Encryption at Host
Important
Azure Disk Encryption for Virtual Machines and Virtual Machine Scale Sets will be retired on September 15, 2028. New customers should use encryption at host for all new VMs. Existing customers should plan to migrate current ADE-enabled VMs to encryption at host before the retirement date to avoid service disruption — see Migrate from Azure Disk Encryption to encryption at host.
Intro
To test the migration from Azure Disk Encryption to Encryption at Host, I have build myself a lab using:
- Type: VM
- Location: Sweden Central
- Availability Zone: 2
- SKU: D2as_v5
- OSdisk: Standard SSD 127 GB
- OS: Windows Server 2022 Azure Edition Hotpatch
The ADE extension is provisioned on the VM:

And the disk is enabled for ADE:

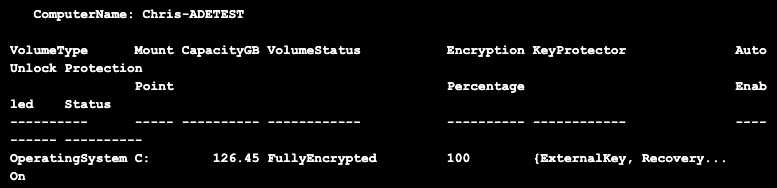
If I run the command: Get-BitLockerVolume -MountPoint “C:” I can see that my operation system disk is encrypted:
Limitations
Migration limitations and considerations
Before starting the migration process, be aware of these important limitations and considerations that affect your migration strategy:
- No in-place migration: You cannot directly convert ADE-encrypted disks to encryption at host. Migration requires creating new disks and VMs.
- Linux OS disk limitation: Disabling ADE on Linux OS disks is not supported. For Linux VMs with ADE-encrypted OS disks, you must create a new VM with a new OS disk.
- Windows ADE encryption patterns: On Windows VMs, Azure Disk Encryption can only encrypt the OS disk alone OR all disks (OS + data disks). It’s not possible to encrypt only data disks on Windows VMs.
- UDE flag persistence: Disks encrypted with Azure Disk Encryption have a Unified Data Encryption (UDE) flag that persists even after decryption. Both snapshots and disk copies using the Copy option retain this UDE flag. The migration requires creating new managed disks using the Upload method and copying the VHD blob data, which creates a new disk object without any metadata from the source disk.
- Downtime required: The migration process requires VM downtime for disk operations and VM recreation.
- Domain-joined VMs: If your VMs are part of an Active Directory domain, more steps are required:
- You need to ensure local administrator username and password to the virtual machine. You may need this for domain re-join if the trust relationship fails
Pre-Requisites
Prerequisites
Before starting the migration:
- Backup your data: Create backups of all critical data before beginning the migration process.
- Test the process: If possible, test the migration process on a nonproduction VM first.
- Prepare encryption resources: Ensure your VM size supports encryption at host. Most current VM sizes support this feature. For more information about VM size requirements, see Enable end-to-end encryption using encryption at host.
- Document configuration: Record your current VM configuration, including network settings, extensions, and attached resources.
How to migrate away from ADE and enable Encryption at Host
This article is writing by testing the source article from Microsoft Learn:
https://learn.microsoft.com/en-us/azure/virtual-machines/disk-encryption-migrate
Important
Linux VMs with encrypted OS disks cannot be decrypted in-place. For these VMs, you must create a new VM with a new OS disk and migrate your data. See the Migrating Linux VMs with encrypted OS disks section after reviewing the general process below.
I have written a complete script that will handle everything from disabling of ADE, monitor decryption state via a custom extension deployment, create new disks and copy data, create new VM, enable encryption at host and do cleanup afterwards. Even re-enable backup if enabled on the old VM. There are multiple prompts in the script, so you can navigate to the old and new VM in the portal and validate everything goes as expected.
Since this procedure essentially makes a clone of the old VM, I strongly advise to test on development servers first. I have tested every part of this script, but you should still test and verify in your environment before running on production servers.
The script in its complete form is here below free to grab for use in your environment. Feel free to reach out if you find any bugs that you would like me to resolve and edit in the script below.
<#
	.NOTES
	===========================================================================
     Version:       1.0.0
	 Updated on:   	27-09-2025
	 Created by:   	Christoffer Klarskov Jakobsen - chkja.dk
	===========================================================================

        PowerShell 7 is required

        Microsoft Azure Module is required
            Install-Module -Name Az
            https://www.powershellgallery.com/packages/Az/

	.DESCRIPTION
    This script will help you migrate an Azure VM from Azure Disk Encryption (ADE) to new disks with Encryption at Host enabled.
    Support Windows
    Supports Gen 2 VMs with standard or trustedLaunch config
    Support 1 network adapter

    The script performs the following steps:
    1. Creates a storage account and container to store a BitLocker decryption status script
    2. Uploads a PowerShell script to the storage account that checks the BitLocker decryption status
    3. Disables ADE on the specified VM and removes the ADE extension
    4. Monitors the BitLocker decryption status using a Custom Script Extension
    5. Creates new managed disks by copying data from the old disks
    6. Deletes the old VM and creates a new one with the new disks and Encryption at Host enabled
    7. Attaches data disks to the new VM
    8. Updates the VM with the new configuration
    9. Deletes old disks
    10. Cleans up resources used during the migration process
    11. Re-enables backup to Recovery Service Vault if previous configured
#>
$StorageAccountName = "ckjteststorage$(Get-Random -Maximum 9999)"
$ContainerName = "scripts"
$BlobName = "BDEStatus.ps1"
$ExtensionName = "BDEValidation"
$LocalFilePath = ".\$BlobName"

if($PSVersionTable.PSVersion -notlike '7.*')
{
    Write-Error "PLease use PowerShell 7" -ForegroundColor yellow
    exit
}

Import-Module -Name Az.Compute

$AzModule = get-module Az.Compute
if($Null -eq $AzModule)
{
    write-Error "Microsoft Azure Compute Module missing"
    exit
}

Import-Module -Name Az.Accounts

$AzModule = get-module Az.Accounts
if($Null -eq $AzModule)
{
    write-Error "Microsoft Azure Accounts Module missing"
    exit
}

Import-Module -Name Az.Storage

$AzModule = get-module Az.Storage
if($Null -eq $AzModule)
{
    write-Error "Microsoft Azure Storage Module missing"
    exit
}


$InformationPreference = 'Continue'

# Login to Azure and select subscription
Connect-AzAccount
$SubscriptionId = Get-AzSubscription | Out-GridView -Title "Select an Azure Subscription" -PassThru
Set-AzContext -SubscriptionId $SubscriptionId.SubscriptionId

$VMName = Read-Host -Prompt "Enter the name of the VM to migrate from ADE to new encrypted at host disks"
$ResourceGroupName = read-Host -Prompt "Enter the Resource Group name of the VM"
$Location = Read-Host -Prompt "Enter the Azure region of the VM (e.g., westeurope)"
$RSV = Read-Host -Prompt "Press Y if the VM was backed by a Recovery Services Vault. This will ensure the new VM is also backed up. Otherwise press N"
if($RSV -eq "Y")
{
    $BackupVault = Read-Host -Prompt "Enter the name of the Recovery Services Vault"
    $BackupVaultRG = Read-Host -Prompt "Enter the Resource Group name of the Recovery Services Vault"

    # === Set the Recovery Services Vault context ===
    $RSV = Get-AzRecoveryServicesVault -ResourceGroupName $BackupVaultRG -Name $BackupVault
    Set-AzRecoveryServicesVaultContext -Vault $RSV
    $BackupPolicyName = $backupItem.PolicyId.Split("/")[10]
    $BackupPolicy = Get-AzRecoveryServicesBackupProtectionPolicy -VaultId $RSV.ID -Name $backupPolicyName

    $BackupContainer = Get-AzRecoveryServicesBackupContainer -ContainerType AzureVM -FriendlyName $vmName -VaultId $RSV.ID
    $backupItem = Get-AzRecoveryServicesBackupItem -VaultId $RSV.ID -Container $BackupContainer -WorkloadType AzureVM | Where-Object {$_.Name -like "*$vmName*"}
}

Register-AzProviderFeature -FeatureName "EncryptionAtHost" -ProviderNamespace "Microsoft.Compute"
$ProviderStatus = Get-AzProviderFeature -FeatureName "EncryptionAtHost" -ProviderNamespace "Microsoft.Compute"
while($ProviderStatus.RegistrationState -ne "Registered")
{
    $ProviderStatus = Get-AzProviderFeature -FeatureName "EncryptionAtHost" -ProviderNamespace "Microsoft.Compute"
}

# 1. Create storage account
New-AzStorageAccount -ResourceGroupName $ResourceGroupName -Name $StorageAccountName -Location $Location -SkuName Standard_LRS -MinimumTlsVersion "TLS1_2"

# 2. Get storage account context and key
$StorageAccount = Get-AzStorageAccount -ResourceGroupName $ResourceGroupName -Name $StorageAccountName
$StorageKey = ($StorageAccount | Get-AzStorageAccountKey)[0].Value
$ctx = New-AzStorageContext -StorageAccountName $StorageAccountName -StorageAccountKey $StorageKey

# 3. Create container for BDE Validation script
New-AzStorageContainer -Name $ContainerName -Context $ctx

# 4. Create file from variable and upload to blob
$scriptContent = @'
Import-Module BitLocker
$BDEDisks = Get-BitLockerVolume

Foreach($Disk in $BDEDisks)
{
    if($disk.MountPoint -notlike "\\*")
    {
        $BDEStatus = Get-BitLockerVolume -MountPoint $disk.MountPoint

        While($BDEStatus.VolumeStatus -ne "FullyDecrypted")
        {
            If ($BDEStatus.VolumeStatus -ne "FullyDecrypted")
            {
                Start-Sleep -Seconds 60;
                $BDEStatus = Get-BitLockerVolume -MountPoint $disk.MountPoint
            }
        }
    }
}
'@
Set-Content -Path $LocalFilePath -Value $scriptContent

# 5. Upload file to container
Set-AzStorageBlobContent -File $LocalFilePath -Container $ContainerName -Blob $BlobName -Context $ctx

# 6. Disable ADE and remove extension
Disable-AzVMDiskEncryption -ResourceGroupName $ResourceGroupName -VMName $VMName -VolumeType "all" -Force
Remove-AzVMDiskEncryptionExtension -ResourceGroupName $ResourceGroupName -VMName $VMName -Name "AzureDiskEncryption" -Force

#  7. Monitor then BitLocker status changes to "FullyDecrypted". We use a Custom Script Extension to run the script from the storage account.

$completed = $false
$retryCount = 0

$FileUri = @("https://$StorageAccountName.blob.core.windows.net/$ContainerName/$BlobName";)
$Settings = @{"fileUris" = $FileUri;"commandToExecute" = "powershell.exe -ExecutionPolicy Unrestricted -File $BlobName"};

$ProtectedSettings = @{"storageAccountName" = $StorageAccountName; "storageAccountKey" = $StorageKey};

while ((-not $completed) -and ($retryCount -ne 3))
{
    try{
        $ExtentionCheck = Get-AzVMExtension -ResourceGroupName $ResourceGroupName `
        -VMName $VMName `
        -Name $ExtensionName `
        -ErrorAction SilentlyContinue

        if($ExtentionCheck)
        {
            Write-Information "##[debug] Removing old extension"
            Remove-AzVMExtension -ResourceGroupName $ResourceGroupName `
            -VMName $VMName `
            -Name $ExtensionName -Force
        }
        Write-Information "##[debug] installing extension for $ExtensionName"
        Write-Information "##[debug] This can take 10-15 minutes to complete"

        Set-AzVMExtension -ResourceGroupName $ResourceGroupName `
        -Location $location `
        -VMName $VMName `
        -Name $ExtensionName `
        -Publisher "Microsoft.Compute" `
        -ExtensionType "CustomScriptExtension" `
        -TypeHandlerVersion "1.10" `
        -Settings $Settings `
        -ProtectedSettings $ProtectedSettings `
        -ErrorAction Stop

        $completed = $true
        $retryCount = 3
    }
    catch
    {
        Write-Information "Next attempt in 60 seconds"
        Start-Sleep -s 60
        $completed = $false
        $retry ++
    }
}

# 8. Created new managed disks

# Stop the VM before creating new disks
$VM = Get-AzVM -ResourceGroupName $ResourceGroupName -Name $VMName
Stop-AzVM -ResourceGroupName $ResourceGroupName -Name $VMName -Force

# Define VM configuration - used for later steps
$NewVMConfig = New-AzVMConfig -VMName $VMName -VMSize $VM.hardwareprofile.vmsize

$VM.NetworkProfile.NetworkInterfaces[0].DeleteOption = "Detach"
Update-AzVM -ResourceGroupName $resourceGroupName -VM $VM

# Get source disk information - for OS disk - and create new empty disk
$VM.StorageProfile.OsDisk.DeleteOption = "Detach"
Update-AzVM -ResourceGroupName $resourceGroupName -VM $VM

$VM = Get-AzVM -ResourceGroupName $ResourceGroupName -Name $VMName

$sourceDiskOS = (Get-AzVM -ResourceGroupName $ResourceGroupName -Name $VMName).StorageProfile.OsDisk
$sourceDiskOS = Get-AzDisk -ResourceGroupName $ResourceGroupName -DiskName $sourceDiskOS.Name
$diskConfig = New-AzDiskConfig -Location $sourceDiskOS.Location -CreateOption Upload -UploadSizeInBytes $($sourceDiskOS.DiskSizeBytes+512) -OsType Windows -HyperVGeneration "V2"
$TargetDiskName = $sourceDiskOS.Name + "ADEDECRYPT"
$targetDisk = New-AzDisk -ResourceGroupName $ResourceGroupName -DiskName $TargetDiskName -Disk $diskConfig

# Add the OS disk for new VM config - for Windows
$NewVMConfig = Set-AzVMOSDisk -VM $NewVMConfig -ManagedDiskId $targetDisk.Id -CreateOption Attach -Windows

# Generate SAS URIs and copy the data
# Get SAS URIs for both disks
$sourceSAS = Grant-AzDiskAccess -ResourceGroupName $ResourceGroupName -DiskName $sourceDiskOS.Name -Access Read -DurationInSecond 7200
$targetSAS = Grant-AzDiskAccess -ResourceGroupName $ResourceGroupName -DiskName $targetDisk.Name -Access Write -DurationInSecond 7200

# Copy the disk data using AzCopy
azcopy copy $sourceSAS.AccessSAS $targetSAS.AccessSAS --blob-type PageBlob

# Revoke SAS access when complete
Revoke-AzDiskAccess -ResourceGroupName $ResourceGroupName -DiskName $sourceDiskOS.Name
Revoke-AzDiskAccess -ResourceGroupName $ResourceGroupName -DiskName $targetDisk.Name

# Data disks
$sourceDisksData = (Get-AzVM -ResourceGroupName $ResourceGroupName -Name $VMName).StorageProfile.DataDisks

foreach ($dataDisk in $sourceDisksData)
{
    $VM.StorageProfile.Datadisks[$DataDisk.Lun].DeleteOption = "Detach"
    Update-AzVM -ResourceGroupName $resourceGroupName -VM $VM
    $sourceDisk = Get-AzDisk -ResourceGroupName $ResourceGroupName -DiskName $dataDisk.Name
    $diskConfig = $null
    $diskConfig = New-AzDiskConfig -Location $sourceDisk.Location -CreateOption Upload -UploadSizeInBytes $($sourceDisk.DiskSizeBytes+512)
    $TargetDiskName = $sourceDisk.Name + "ADEDECRYPT"
    $targetDisk = New-AzDisk -ResourceGroupName $ResourceGroupName -DiskName $TargetDiskName -Disk $diskConfig

    # Generate SAS URIs and copy the data
    # Get SAS URIs for both disks
    $sourceSAS = Grant-AzDiskAccess -ResourceGroupName $ResourceGroupName -DiskName $sourceDisk.Name -Access Read -DurationInSecond 7200
    $targetSAS = Grant-AzDiskAccess -ResourceGroupName $ResourceGroupName -DiskName $targetDisk.Name -Access Write -DurationInSecond 7200

    # Copy the disk data using AzCopy - tool must be installed and in PATH
    azcopy copy $sourceSAS.AccessSAS $targetSAS.AccessSAS --blob-type PageBlob

    # Revoke SAS access when complete
    Revoke-AzDiskAccess -ResourceGroupName $ResourceGroupName -DiskName $sourceDisk.Name
    Revoke-AzDiskAccess -ResourceGroupName $ResourceGroupName -DiskName $targetDisk.Name
}

# 9. delete old vm and create new one with new disks
Read-Host -Prompt "Press Enter to delete the old VM and create a new one with the decrypted disks"
Remove-AzVM -ResourceGroupName $resourceGroupName -Name $VMName -Force

# Create the VM
$NewVMConfig = Set-AzVMBootDiagnostic -VM $NewVMConfig -Enable
$NewVMConfig.LicenseType = $vm.LicenseType

# Deploy VM as trusted launch VM if specified in the parameters
#$NewVMConfig = Set-AzVmSecurityProfile -VM $NewVMConfig -SecurityType $vm.SecurityProfile.SecurityType

$nicId = $vm.NetworkProfile.NetworkInterfaces[0].Id
$nicName = $nicId.Split("/")[-1]
$nic = Get-AzNetworkInterface -ResourceGroupName $resourceGroupName -Name $nicName
$NewVMConfig = Add-AzVMNetworkInterface -VM $NewVMConfig -Id $nic.Id

New-AzVM -ResourceGroupName $ResourceGroupName -Location $Location -VM $NewVMConfig

Start-Sleep -Seconds 30

# Get the VM
$NewVM = Get-AzVM -ResourceGroupName $ResourceGroupName -Name $VMName
$NewVMName = $NewVM.Name

if($vm.SecurityProfile.SecurityType -eq "TrustedLaunch")
{
    Write-Information "Enabling Trusted Launch features on the new VM"
    Stop-AzVM -ResourceGroupName $ResourceGroupName -Name $NewVM.Name -Force
    Start-Sleep -Seconds 5
    Update-AzVM $ResourceGroupName -SecurityType TrustedLaunch -EnableSecureBoot $true -VM $NewVM
}

# Enable Encryption at Host
Update-AzVM -VM $NewVM -ResourceGroupName $ResourceGroupName -EncryptionAtHost $true

# Attach the data disks
Foreach($dataDisk in $sourceDisksData)
{
    $targetDisk = Get-AzDisk -ResourceGroupName $ResourceGroupName -DiskName ($dataDisk.Name + "ADEDECRYPT")
    $NewVM = Add-AzVMDataDisk -VM $NewVM -ManagedDiskId $targetDisk.Id -Lun $dataDisk.Lun -CreateOption Attach
    Update-AzVM -ResourceGroupName $ResourceGroupName -VM $NewVM
}

# 10. Clean up resources
Read-Host -Prompt "Press Enter to delete the old VMs disks"

# Delete the original disk
Remove-AzDisk -ResourceGroupName $ResourceGroupName -DiskName $sourceDiskOS.Name -Force
Foreach($dataDisk in $sourceDisksData)
{
    Remove-AzDisk -ResourceGroupName $ResourceGroupName -DiskName $dataDisk.Name -Force
}

# Delete the storage account and local script file
Remove-AzStorageAccount -ResourceGroupName $ResourceGroupName -Name $StorageAccountName -Force
Remove-Item -Path $LocalFilePath -Force

# 11. Enable backup if previous configured to an RSV

if($backupItem.Name -like "*$NewVMName*")
{
    Write-Information "Will disable existing backup protection before enabling again"
    Disable-AzRecoveryServicesBackupProtection -Item $backupItem[0] -Force
    Enable-AzRecoveryServicesBackupProtection -Name $NewVMName -ResourceGroupName $ResourceGroupName -Policy $BackupPolicy -VaultId $RSV.ID
}

# Script end
Write-Information "End of script - please examine VM to see if migration was completed as expected"
Have feedback on this post?
Send me a message and I'll get back to you.