
Azure Local – change physical network adapter cards in existing Network Intent
This guide tells you have to carry out the swap of network adapter cards in nodes in Azure Local stack.
Hint: You can find lots of information about networking at: Azure Local Supportability on GitHub
Maybe not something everybody ever has to do, but funny enough I have had to do this exact procedure multiple times now on different stacks. Either because we wanted better network adapter cards than originally installed, existing cards had hardware/driver issues or simply because they lost their certification (yes it can happen, I have seen it with some cards working in a stack for multiple years, but recent solution updates from Microsoft disqualify them).
In the below config, Compute and Management Network Intent are joined together, and named compute_management.
BEFORE YOU BEGIN: make sure you have local administrator user on each node. Domain users may not be able to log in doing this process.
- Stop service NetworkATC on all other nodes, beside node 1 in the cluster
- Set node 1 in drain mode
- Power off node 1
- Change Network adapter card on node 1
- Power on node 1
- Connect to node 1 via iLO on HPE servers, BMC in Lenovo servers or iDrac on Dell servers( or you can connect directly to nodes via console (requires monitor and keyboard))
Important! Check adapter driver on the newly installed network adapter cards!
Get-NetAdapter pfNIC* | fl *driver*
Driver must not be Microsoft – It has to be driver from the vendor Mellanox/Intel/Broadcom etc.
To install drivers from HPE Service Pack (require that you copy the HPE SPP to the C drive on each node)
Mount-DiskImage -ImagePath ‘C:\HPE\Service Packs\P62619_001_gen10spp-2023.03.00.00-SPP2023030000.2023_0323.27.iso’
Get-Volume
E:
.\packages\smartupdate /s
- Configure static IP address on one of the new adapters on node 1 – choose one that is not already in use. The IP address will be overwritten by Hyper-V, once the operation is completed.
- Rename adapter on ONLY node 1 in PowerShell: (do not use the old names of the old nics)
Rename-NetAdapter -Name "%Adapter01%" -NewName "pfNIC03"
Rename-NetAdapter -Name "%Adapter02%" -NewName "pfNIC04" - Edit Network Intent, to include the new adapters (old adapters will be removed aswell)
Update-NetIntentAdapter -Name compute_management -AdapterName pfNIC03,pfNIC04 - Edit Hyper-V VM Switch Team ONLY on node 1 to include the new adapters (old adapters will be removed aswell)
set-vmswitchteam -Name "ConvergedSwitch(compute_management)" -NetAdapterName pfNIC03,pfNIC04 - Force update of NetIntent ONLY on node 1
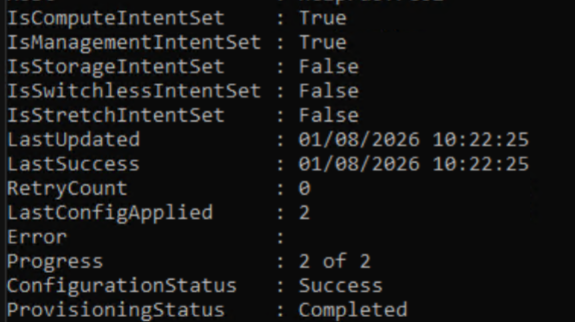
Set-NetIntentRetryState -ClusterName HCICLUs01 -Name compute_management -NodeName NODE01 - Check Network Intent status (should be completed without errors on node 1, it can take 2-5 minutes to complete)
Get-NetIntentStatus -Name compute_management
- Set node 1 back in production.
- drain node 2 and repeat step 2-8, 10-13 for this node also. Note that you do not need to do step 9 again, since the network intent has already been updated globally in the cluster, and after node reboot, NetworkATC service will be running again and getting config from cluster.
Have feedback on this post?
Send me a message and I'll get back to you.