
Table of Contents
Intro
Sending emails from an application can be very useful. There are also other scenarios where Azure Communication Services can be very useful to implement, e.g. when moving from Exchange Online Basic Auth which Microsoft will retire by September 2025.
Key considerations
Sending rate limits
Microsoft informs about the initial rate limits for the service per subscription for custom domains:
| Operation | Scope | Timeframe (minutes) | Limit (number of emails) | Higher limits available |
|---|---|---|---|---|
| Send Email | Per Subscription | 1 | 30 | Yes |
| Send Email | Per Subscription | 60 | 100 | Yes |
| Get Email Status | Per Subscription | 1 | 60 | Yes |
| Get Email Status | Per Subscription | 60 | 200 | Yes |
Microsoft recommends running the domain for 2-4 weeks with low usage, before moving to higher usage.
After that period of time, customer can raise a support ticket with Microsoft to have the limits raised.
Azure Communication Services email service supports high volume up to 1-2 million messages per hour. High throughput can be enabled based on several factors, including:
- Customer peak traffic
- Business needs
- Ability to manage failure rates
- Domain reputation
Follow this Microsoft guide to request sending limit rates: Quota increase for email domains – An Azure Communication Services concept document | Microsoft Learn
Source article: Service limits for Azure Communication Services – An Azure Communication Services article | Microsoft Learn
Size limits
| Name | Limit |
|---|---|
| Number of recipients in email | 50 |
| Total email request size (including attachments) | 10 MB |
| Maximum authenticated connections per subscription | 250 |
To email file attachments up to 30 MB, make a support request .
If you need to send email file attachments larger than 30 MB, use this alternative solution. Store the files in an Azure Blob Storage account and include a link to the files in your email. You can secure the files with a shared access signature (SAS). A SAS provides secure delegated access to resources in your storage account. By using a SAS, you have granular control over how clients can access your data.
Benefits of using a Blob Storage account:
- You can handle large-scale files.
- You can use a SAS or keys to precisely manage file access.
Source article: Service limits for Azure Communication Services – An Azure Communication Services article | Microsoft Learn
Username length
Since the format of the username used for authentication is a combination of the following
<ACS-Name>.<EntraIDAppID>.<TenantID> – without the <> symbols
Username can quickly be 70-90 characters long.
If using ACS with SMTP Auth and sources like printers or other legacy SMTP client systems, you need to make sure the very long username is supported by the client system.
Most old printers have a limit of 15 or 20 characters.
Secret complexity
Since the secret generated for the Entra ID App Registration that will be used for authentication includes characters like ~ and other special characters, you need to make sure the supported password complexity is supported by the client system.
Secret expiration
Since the secret for the required app registration will expire, you need to add this system to your lifecycle management system with proper documentation about how to update the secret in ALL the client systems you are going to configure this for in production.
SPF hard fail requirements
When adding custom domain to Email Communication System instanse (ECS), this domain must have proper SPF and DKIM configured. SPF record can be an existing for the domain as long as it includes include:spf.protection.outlook.com
But if your existing SPF record is set for anything other than hard fail (-all), (e.g. soft fail (~all)), domain validation for SPF will fail.
The best way to remediate this is to implement -all on the SPF record, thereby enabling hard fail.
But if you require lower security settings, you can change your current setting to -all while verifing domain in ECS, and once the domain is verified, you can switch back to your initial setting for SPF on your custom domain.
How to implement
Deploy ACS and ECS into resource group
- In the Azure portal, navigate to Communication Services:

- Create new instance
- Select valid resource group or create new, then give the ACS a name and choose data location that is near sending system (also thing about data boundary regulations to comply with)

- then in the Azure portal, navigate to Email Communication Services:

- Create new instance
- Select valid resource group or create new, then give the ECS a name and choose data location same as for the ACS we created before:

- Navigate into the newly created ECS. Go to Provision domains, add domain and then Custom domain:

- Insert name of your domain and confirm:

- Select Add.
- Now verify the domain:

- You will be given a TXT record that must be added to the domain (where you manage DNS records for your custom domain) before you can proceed:

- Once you have verified the domain, you will be presented with SPF and DKIM records that also must be added to your domain.
CloudFlare looks like this for DKIM:
And for SPF: (here we have existing SPF record that works fine)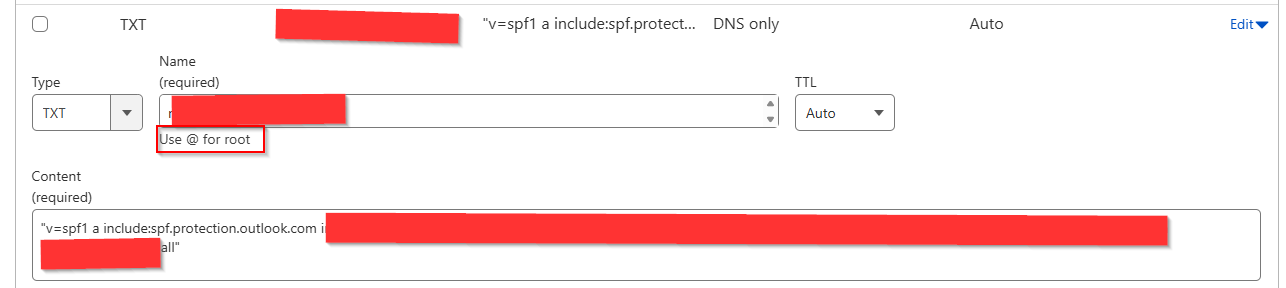
Once all records are configured and we wait a few minutes, the custom domain is now verified:
Connect ECS to ACS
- In the Azure Portal, go to the Azure Communication Services instance you created before.
- Under Email > Domains, select Connect domains:

- Now choose the subscription, resource group and then the ECS we created before. Now select the custom domain to link (picture does not show me selecting the domain, because had already done that previous):

- Now the custom domain is ready to be used in the ACS:

Add sending addresses to the custom domain
- In the Azure Portal, go to the Azure Email Communication Services.
- Under Settings > Provision domains, select the custom domain we added before, to enters its settings:

- Under Email Services > MailFrom Addresses we can see the default no reply address but the option to add new addresses is greyed out:

- We can however add using AZ CLI command.
You can use PowerShell with AZ CLI installed our just use cloud shell in Azure:

the full command is:az communication email domain sender-username create --email-service-name "ACS-Name" --resource-group "RG-of-ACS" --domain-name "yourcustomdomain.dk" --sender-username "username-WITHOUT-UPN" --username "username-WITHOUT-UPN" --display-name "Readable Display Name of Account"
Example:az communication email domain sender-username create --email-service-name "acses-weu-prod-02" --resource-group "rg-weu-prod-acs" --domain-name "chkja.dk" --sender-username "smtp" --username "smtp" --display-name "CHKJA SMTP Service"
Afterwards we now have a few MailFrom addresses: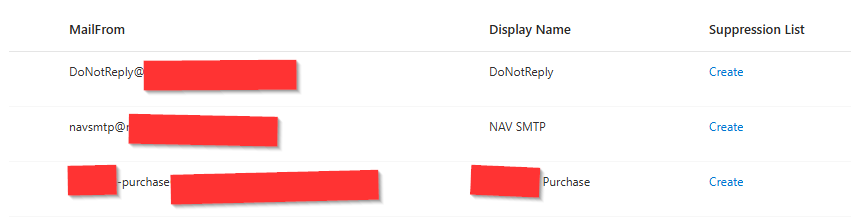
Creating App Registration in Entra ID
- In Entra ID, under Identity > Applications > App registrations:

- Select New Registration.
- Give the application a name

- And then hit register:

- Now go into this new app registration.
- Under Certificates & Secrets and then under Client secrets, hit the New client secret botton:

- Note the Value of the secret since it will not be visible once you navigate away from this page.
- Back in the overview of the application, take note of the Application ID, and Tenant ID (some of it is masked in the picture below for security reasons). You will need theese informations in later sections:

Creating custom RBAC role in Azure and assigning permissions
To grant the app registration the required permissions on the ASC (not on the ECS, it needs to be on the ASC), Microsoft have a good description of this here: Set up SMTP authentication for sending emails – An Azure Communication Services article | Microsoft Learn
Only follow this part:
 |
Down to this part:
 |
So in other words, complete the guide but stop once you reach the part where you about to create the SMTP credentials, since these steps have already been covered in this guide. (we already have the App ID, Tenant ID and created secret). We also know how to format our username (this was covered under the considerations part of this guide)
Verify email relay
Now we have configured ACS and ECS, including custom domain and app registration with required RBAC permissions.
We can now use PowerShell to send a test email.
The format of the username used for authentication is a combination of the following
<ACS-Name>.<EntraIDAppID>.<TenantID> – WITHOUT THE <> SYMBOLS
e.g.: acs-weu-prod-01.appid.tenantid
where appid and tenantid is the IDs we saw under the app registration overview page:
I just this simple PowerShell code block to test email functionality:
# Variables
$username = "INSERT-USERNAME-HERE-FORMATTED-AS-DOCUMENTED"
$secret = "PASTE-SECRET-VALUE-HERE"
$Server = "smtp.azurecomm.net"
$Port = "587"
$from = "noreply@chkja.dk"
$recipient = "dummymail@chkja.dk"
$subject = "Testing if ACS and ECS works"
$body = "This is just a test mail to verify our system works"

# Send mail commands
$secpasswd = ConvertTo-SecureString $secret" -AsPlainText -Force
$cred = New-Object System.Management.Automation.PSCredential ($username, $secpasswd)

Send-MailMessage -SmtpServer $Server -Port $Port -UseSsl -Credential $cred -From $from -To $recipient -Subject $subject -BodyAsHtml $body -Encoding ([System.Text.Encoding]::UTF8)
Setup production systems
If your system supports Microsoft Azures Email SDKs, please follow this guide:
Send an email using Azure Communication Services – An Azure Communication Services article | Microsoft Learn
But if the case is to configure for SMTP mail sending, use the following parameters in your SMTP configuration:
| Device or Application setting | Value |
|---|---|
| Server / smart host | smtp.azurecomm.net |
| Port | Port 587 (recommended) or port 25 (does not work on most subscriptions in Azure) |
| TLS / StartTLS | Enabled |
| Username and password | Enter the Microsoft Entra ID credentials from an application with access to the Azure Communication Services Resource |
The format of the username used for authentication is a combination of the following
<ACS-Name>.<EntraIDAppID>.<TenantID> – WITHOUT THE <> SYMBOLS
Secret lifecycle
Since the secret for the required app registration will expire, you need to add this system to your lifecycle management system with proper documentation about how to update the secret in ALL the client systems you are going to configure this for in production.
The interval is determined by the amount of days or months you selected upon secret creation in the App registration.
It is recommended to add some internal notes to the app registration. This makes it much easier to understand what the app registration is used for, when visited by others or yourself in a year:
4 visits in last 30 days
Comments